

New Zealand Ground Conditions guide: Do I need a geotechnical engineer?
Ground conditions. Expansive Soil, Liquefiable ground conditions, TC1, TC2, & TC3 explained.
The recent changes to the NZ Building Code, clause H1, are the largest energy efficiency improvements to the home building process in more than a decade.
Damp and mouldy homes with poor ventilation are not great places to live. The Ministry of Business, Innovation and Employment (MBIE) implemented the H1/AS1 and H1/VM1 for housing, and H1/AS2 on May 2023.
In a nutshell, the revisions aim to foster warmer, drier, and more comfortable living environments in New Zealand homes and buildings. This will reduce the amount of energy New Zealand uses and provide positive health outcomes. This sounds great, doesn't it?
There is a downside:
These rules aren’t going to go away, they will continue to increase over time. You will need to be clever. How can you get the upside of a warmer healthier home, whilst minimizing the impact on your wallet?
This is a complex question and the answer is complex too. There are so many variables to consider. At Tidy Slabs, we like to make the complex simple, as the saying goes, “How do you eat an elephant? You have to start with the first bite.” We’ll focus on the first bite - concrete foundations. Sadly, we’ve seen many clients work through this alone and making costly decisions they could have avoided. Tidy Slabs are here to help.
This article will explain the H1 changes and how they affect insulated concrete slabs. We will look at:
Our goal is that once you have read this article - you will know everything there is to know about the H1 changes, how they affect your concrete slab and help you understand insulated concrete slabs.
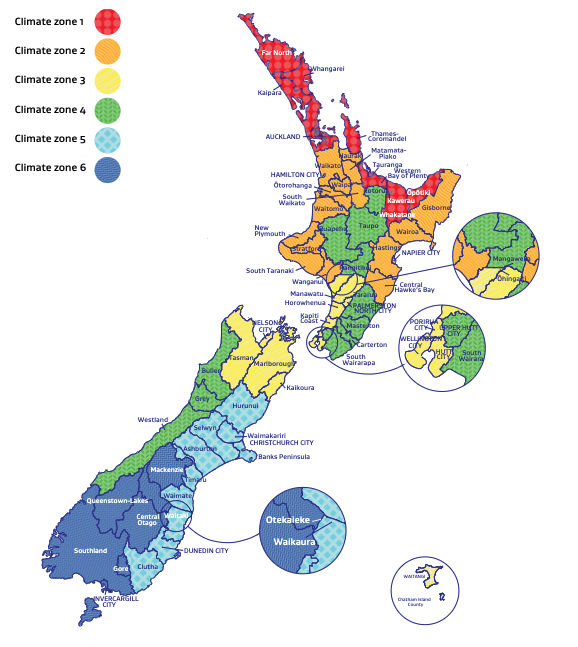
The target R-value and the insulation requirements for your slab depend on a few things, the first being the Climate Zone where you are building. As a rule of thumb, colder regions require a higher R-value and more insulation and warmer areas require less.
In the table above, you’ll see the requirements for windows and slabs will change depending on your Climate Zone, whereas roof and wall requirements are the same for everyone.
Compared to slabs, timber floors are another kettle of fish. They are not as good as retaining heat so more insulation is needed. For example, North Island timber floors require an R-value of 2.5 and South Island floors R2.8 -R3.0. A concrete slab requires only R1.5 because it retains heat better.
For timber floors, you’ll need specific (and more expensive) products to bump up your floor’s R-value. Another article would be needed to explain the nuances and benefits of timber floors.
Take this away: when deciding if a timber floor is right for you, make sure you properly cost out the H1 requirements.
In the world of H1 and R-values, the area-to-perimeter ratio for your slab is a critical calculation. Modelling on all of the different types of slabs is based on this ratio. The more the slab is exposed to the environment, the more insulation you need.
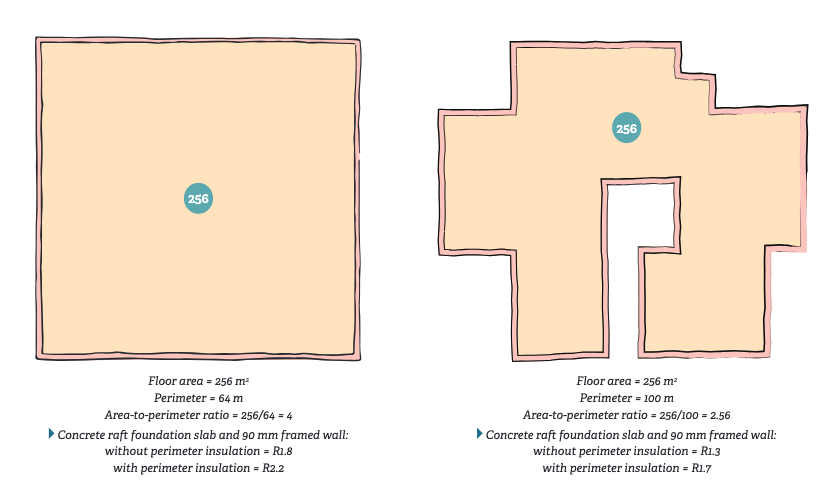
This ratio simply compares the amount of slab edge there is compared to the total area of the slab. The lower the area-to-perimeter ratio, the more insulation you need. The higher the area-to-perimeter ratio, the less insulation you need. The more slab is exposed to the elements the more heat will be lost.
As slabs get smaller in their area, their perimeter usually does not decrease at the same rate. As a consequence, their Area to Perimeter ratio gets lower and lower, meaning they need more insulation to achieve the same R-value as a larger slab. Usually, as the slab area gets bigger, the perimeter again does not get bigger at the same rate and so their Area-to-perimeter ratio gets larger. Larger slabs will require less insulation as a result.
Let's look at some examples using Expol’s Pod Raft Slab Table
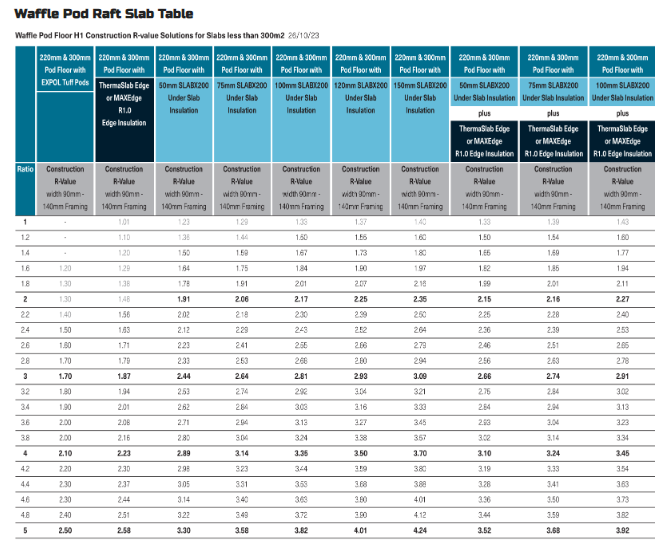
Example #1 - A small slab in Zone 1-4 Auckland, Hamilton or Wellington with a target R-Value of R1.5
A small 60sqm house will likely have a perimeter of 31m.
To calculate this you divide 60m2 / 31m
= A/P Ratio - 1.93.
Now using the table above you can see that a standard slab using 220mm tuff pods (first column) with an A/P ratio of 1.93 will only achieve an R-value of 1.3. This is below the required target. To exceed R-1.5 you will need to add a 50mm sheet of Slabx200 and you will achieve an R-Value of R-1.91. (That extra 0.41 can be used to reduce the R-value required in the ceiling)
Example #2 - A larger slab in Zone 1.4 Auckland, Hamilton or Wellington with a target R-Value of R1.5
A 250m2 house will likely have a perimeter of 75m.
To calculate this you divide 250m2 / 75m
= A/P Ratio - 3.33
Using the table above you can see that a standard slab using 220mm tuff pods (the first column) with an A/P ratio of 3.33 will achieve an R-value of 1.9 without needing to add any more insulation. This means you don’t need to do a thing! But because you have exceeded the required R-value - there is a bonus! Look out for the calculation method below - you may be in for a pleasant surprise!
Area to Perimeter Ratio fun facts
There is no one-size-fits-all solution for calculating H1 compliance. There are three! Each of the different calculation methods can yield a different result depending on your inputs. A misunderstanding of how to use these tools could cost you big time (we see this all the time).
You will get more bang for your buck when building your house if you understand how to best calculate your design. Below are the three methods for Calculating H1 Building Code compliance.
Opting for the Schedule method is the most straightforward approach. It involves meeting or surpassing the minimum construction R-values specified in H1 for ceilings, walls, windows, and floors. (These are the R-values stated in the table above for each Climate Zone). However, If your walls have more than 30% glazing, you will need to use the Calculation method - but this may just work in your favour…
If you choose the Calculation method, you get flexibility, which allows for a higher percentage of glazing compared to the Schedule method. This method allows trading off between elements so you can use higher R-values to offset low R-values e.g. thermal performance of ceilings, walls, windows, and floors. This method considers energy usage more comprehensively, providing a holistic perspective of the structure as a whole.
What’s the bonus of the calculation method?
You can trade off R-values between elements so if you have a higher R-value than you need in your slab, you might be able to reduce the ceiling insulation and save money. The question you have to ask yourself is, “Do I want less insulation in my ceiling?”
The one caveat is that you must achieve 50% of the Schedule method R-value. This also works in reverse. If your glazing, walls and ceiling are specified to a high R-Value - then there is a good chance that you could cut your R-Value target for your slab from R1.5 to R0.75 ( 50%) - this would effectively remove the need for any additional insulation.
If you choose the modelling method, your designer will have more flexibility. This is more complex to calculate for compliance, so you will probably need an expert. (They do cost but you’d be using them to save you money.) In this method, the designer will model the energy performance of your proposed building by using a simulation of the building to predict its space heating loads and cooling loads. The modelling will show the building does not exceed the energy use for the relevant climate zone.
In a nutshell, it is the most accurate method and will ensure you are not over-insulating at a greater cost, but you will spend money on your expert.
There are several R-value for insulation calculation tools that can help you or your designer to calculate your building’s H1 compliance.
There are two main types of calculators available.
JUST SO YOU KNOW: Product-specific tools generally lead you to the conclusion that their product is the right solution. Although it may be true that a product meets the requirements - it may not be the most effective solution for your situation - so beware! If you read this whole article you’ll be more informed anyway!!
Below are the general and not product specific calculators.
Design Navigator
Branz
Product Specific Tools - Slabs
You have three main options:
You can always do this yourself using the calculators in the links above. It is not as hard as it may seem and most builders/homeowners could spend a a few evenings reading up on what they need to know and easily use the Calculation method to get a good result. But who has time for that? We suggest using well-informed experts. A good design should save you money.
Your first and best port of call is your architect or draftperson (provided they are clued up). It is the architect's responsibility to provide the calculations to the council to prove that the design is compliant with the H1 requirements. If they have done their learning they will employ the Calculation method and get the best bang for your buck. If you are really lucky they will know how to do the modeling method.
BEWARE! Many architects may not know that the Calculation and Modelling method is available to them. For these reasons, their default may be the schedule method. If cost is your #1 priority, ask if they can use the Calculation method. The one question may prompt them to do a little Googling and save you money.
Some architects and homeowners choose to work with building efficiency modelling experts to make sure their house is as efficient as possible. This is great on many levels. It will mean you have an extremely efficient house that’s Insulated, heated, and ventilated correctly. As you would expect, their consultancy fees and the resulting design will cost you a little more money.
Although this is certainly optimal in the long run, let's be realistic. We’re all working to a budget. I will leave this decision to you, but needless to say, generally speaking, you will get a great result, but it will cost you the most upfront.
Hold on a minute, what if I have in-floor heating in my slab?
If you have in-floor heating, no matter which zone you are in, or the method of calculation you are using, you must achieve a minimum R-value of R-2.5. You must also have edge insulation!
But why? I hear you ask.
Well, one of the goals of the H1 changes is to make our houses more energy efficient. Slab edges are one of the worst offenders of heat loss as they are directly exposed to the elements. When we consume gas or electricity to heat hydronic pipes within the slab, heat gets wasted at the slab’s edge. If we are consuming energy to heat our floors, we’ve got to make sure we are retaining as much of that heat as possible. This is better for the environment and our power bills.
Hint: There’s no one-size-fits-all all option
There are two main types of edge insulation for your slab. In-slab or Post Fix. In most cases both in-slab and postfix will achieve the same R-value as each other.
Explanation: Insulation that is secured within your slab formwork before pouring the concrete - it is generally handled by your slab contractor at the time of constructing your slab.
Examples: Firth Hotedge, Expol SlabX Edge, Duratherm Gold, Maxraft, SlabEdge
Benefits: completed at the time of the slab.
Downsides: Compromises the hold-down bolts for the framing, may still need to be plastered and painted at the end of the project, susceptible to damage throughout the build, and not easily adapted to varying slab edge depths.
Explanation: This is an edge insulation that is glued to the edge of the slab long after the slab is poured. It can be completed by any trade, but the way to get more bang for your buck will be from a plastering contractor who can supply, install, plaster and paint in one go.
Examples: Duratherm Blue, Expol SlabX Edge
Benefits: Installed after landscaping to avoid any damage to the installation throughout the build. No compromising of the hold-down bolt strength. Can be plastered and painted at the same time as installation. More cost-effective than most in-slab solutions.
Downsides: Potential modification to cladding and cavity detail required. Slab sitting flush with the cladding may be visually unappealing.
You may get tired of hearing ‘every situation is different’ but it’s true. It depends on what you are trying to achieve. To summarise, Edgeboard (inslab) or Resene Durratherm Blue* (post-fix) is your best bang for your buck. They are both approximately $90 per linear meter installed and they are a finished product so no further plastering or painting is required.
*Resene Duratherm Blue is a post-fix solution that can be supplied, installed, plastered and painted at the end of the build by a Resene-certified contractor. This will not compromise your hold-down bolts for the frames and it will not be damaged during the landscaping process.
Here’s a summary of the main Slab Edge insulation products
Firth’s Hotedge
Resene’s Duratherm (Gold or Blue)
Edgeboard
SlabX
Max edge
There are two main considerations:
1. Compressive strength
When specifying under-slab insulation you (or your engineer) need to consider the comprehensive strength of the polystyrene sheet. This is separate from the H1 calculations required by your designer. If the compressive strength of the insulation is low, your engineer will not be able to specify it as the weight from the structure may crush the insulation. On the flip side, if your compressive strength is higher than needed you may be paying for a product that you don’t need.
2. Constructability
When considering under-slab insulation, you also need to consider the foundation's constructability and how you will install the insulation. For example, insulation specified in footings or around piles will be much more time-consuming and more wasteful with the material than let’s say a waffle slab. This is because you need to cut the poly and shape it to fit around the piles. We recommend if it’s possible, avoiding this type of slab or looking at other options to insulate.
Underslab insulation products worth considering:
H-Grade - Thermaslab
XPS
Slabx200
Maxraft
Maxraft is a slab system invented in Queenstown specifically for the colder climate. The system incorporates a unique L-shaped insulated edge form around the perimeter with Poly pods and insulation sheets in the middle. It creates one of the highest R-Values possible and is the most commonly specified insulation system for high-end homes with in-floor heating.
Quickset
Quickset is another innovative New Zealand-developed product that not only provides edge and under-slab insulation in one package but also works as the formwork for the slab itself. They have an impressive online calculator that helps specify what products are needed and how they affect the R-value. You also have the added benefit of using any pod system you desire ( Plastic or Poly). The Quickset solution in most cases will meet or exceed the R-Value requirements for your area.
HOLD ON! Fully insulated slab systems are great because they are all in one tidy solution to H1 requirements with great support and online tools for design. However, if you are price sensitive, building outside of the South Island and not incorporating in-floor heating, you are likely getting an R-value greater than you need at a much larger cost than you could pay by going the standard slab route. Although, bear in mind that H1 requirements continue to change. Sooner or later, a fully insulated slab will likely be the only way.
Compare insulated concrete foundation options in New Zealand
Download the summary of this article here. Master concrete insulation and insulated concrete slabs. Get your R-value for insulation, edge slab, and under slab insulation. Plus, H1 building code changes!